Woocommerce PayPal Payments

woo
Woocommerce PayPal Payments & Fastlane
WooCommerce PayPal Payments is a full-stack solution that offers powerful and flexible payment processing capabilities. Set up quickly. Enable payment acceptance easily. Offer your customers a seamless checkout experience and get paid quickly.
WooCommerce PayPal Payments is the only payments extension that includes PayPal, Pay Later, Vaulting, advanced credit and debit card processing, and local payment methods.
By integrating with WooCommerce PayPal Payments, you can:
- Offer full-stack payment processing – the choice of payment methods for your customers.
- Smart payment buttons – present relevant payment methods to your customers in specific markets. With one integration, sellers can automatically offer more payment method options as they become available.
- Fully customizable card fields for Advanced Card Payments.
- Use the latest PayPal features in a single integration, including PayPal Pay Later.
Requirements
To install WooCommerce PayPal Payments, you need:
- WordPress Version 5.3 or newer (installed)
- WooCommerce Version 3.9 or newer (installed and activated)
- PHP Version 7.2 or newer
- PayPal business or personal account
Installation
- Log in to WordPress Admin.
- Go to Plugins > Add New.
- Search for the WooCommerce PayPal Payments plugin.
- Click on Install Now and wait until the plugin is installed successfully.
- You can activate the plugin immediately by clicking on Activate now on the success page. If you want to activate it later, you can do so via Plugins >Installed Plugins.
Connect PayPal Account
Once the WooCommerce PayPal Payments plugin has been installed and activated, it needs to be connected to your PayPal account.
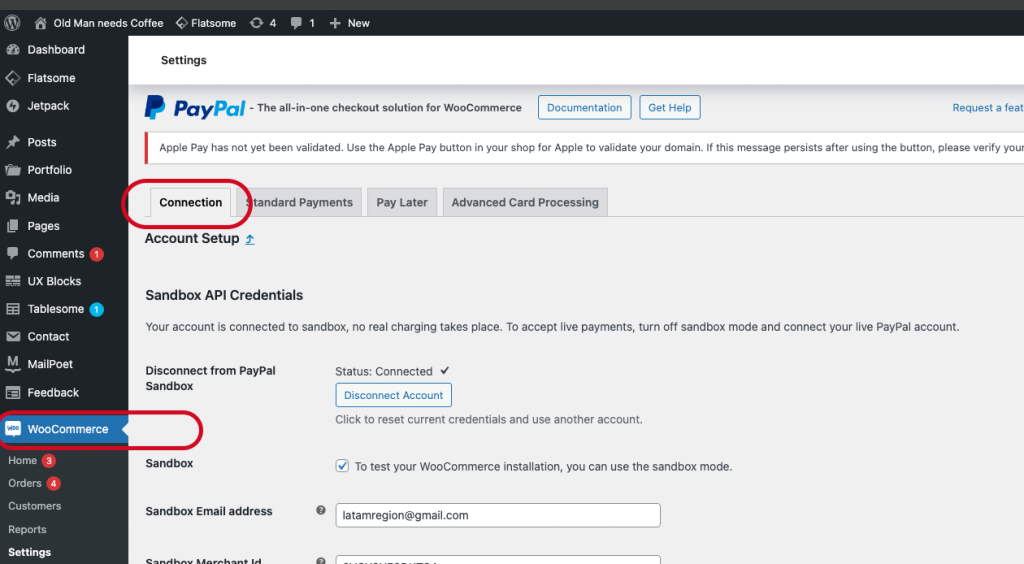
The integrated onboarding connects a PayPal account via login credentials (email and password) without the need for API credentials. The onboarding automatically creates a new REST application in the PayPal developer site, registers the webhooks, and enables relevant features such as Vaulting. The account can also be connected manually, but the onboarding process is the preferred option as it automatically configures the REST App and credentials.
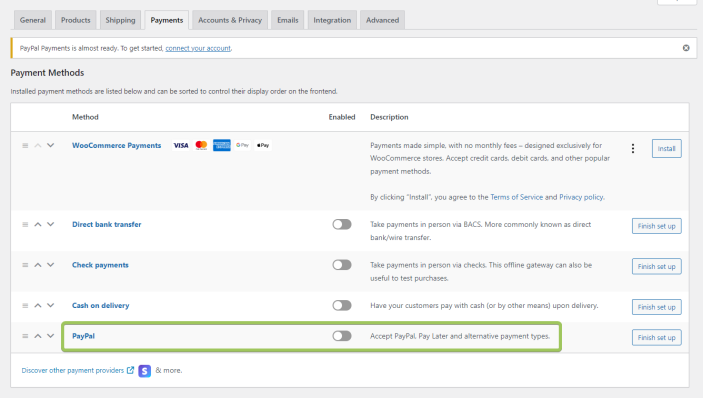
- After installing and activating the WooCommerce PayPal Payments plugin, go to WooCommerce > Settings
- Click the Payments tab
- The Payment methods list may include two PayPal options
- Click Set Up (or Manage if the extension is already active) next to PayPal. (not PayPal Standard)
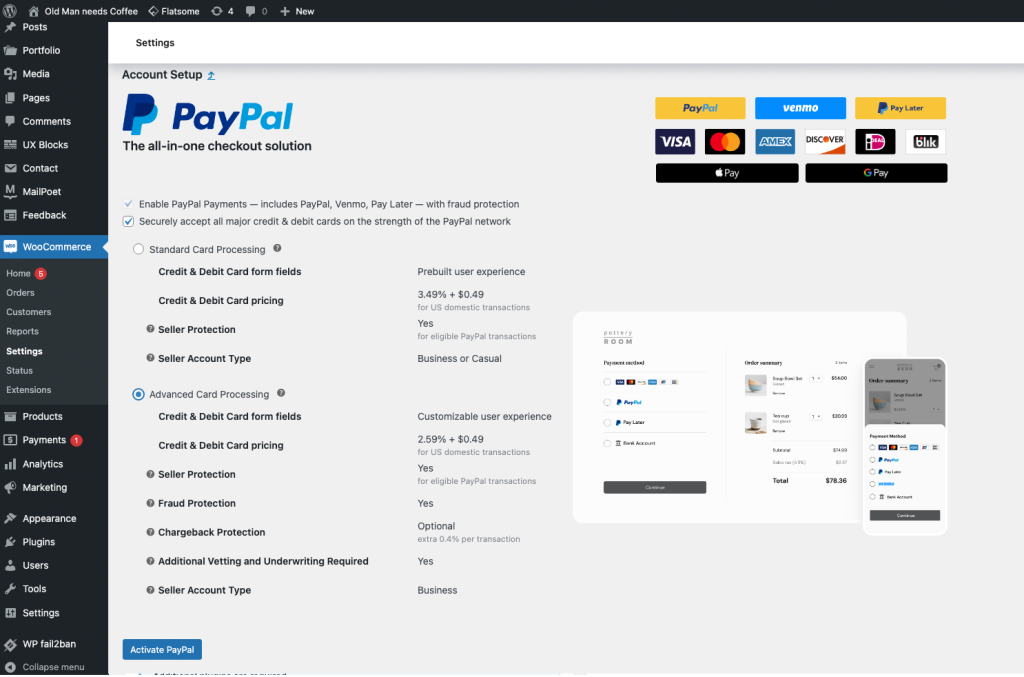
- The Account Setup section presents different options for the onboarding process:
Click on Connection Tab to begin the PayPal Onboarding Process
7. Check Securely accept all major credit & debit cards on the strength of the PayPal network to enable credit & debit card functionality (this can be changed after connecting)
8. Activate PayPal by clicking the button and following the prompts to connect your live PayPal account. Click Test payments with PayPal Sandbox to test the integration using the PayPal Sandbox. If you don’t have a PayPal account yet, you can create one from the activation window.
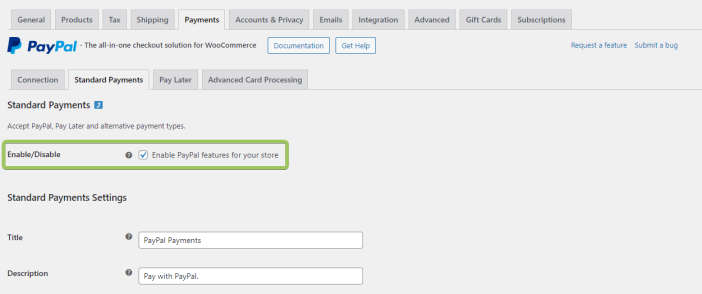
9. After completing the connection steps, navigate to the Standard Payments tab and ensure the checkbox next to Enable/Disable is checked.
Configure your desired PayPal button appearance and click Save changes to enable PayPal. By default, the PayPal gateway and smart buttons are enabled on the Checkout, single product, and Cart pages.
General Integration Configuration
Standard Payments
To customize the Smart buttons check the box Customize Smart Buttons Per Location in the Standard Payments settings
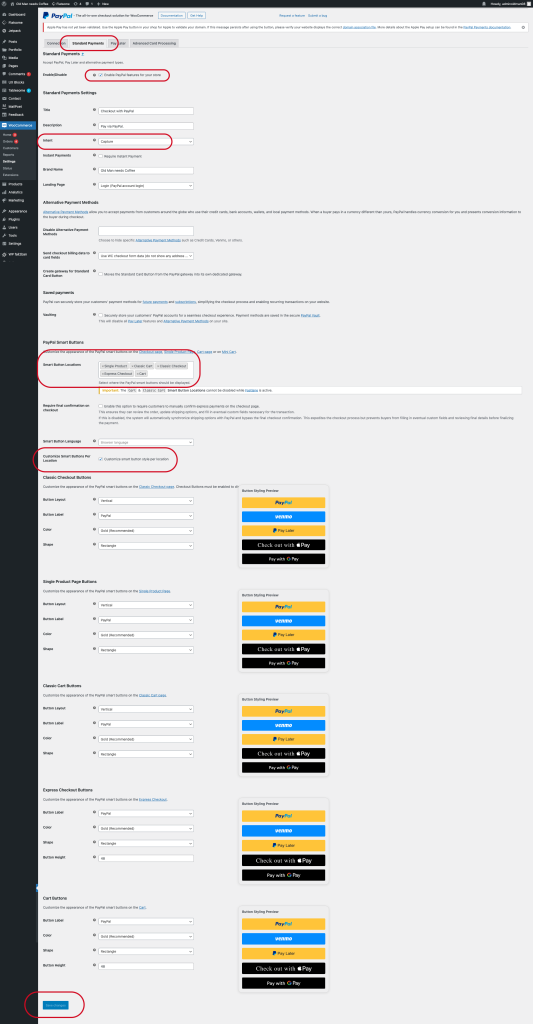
- Enable/Disable – Enable the PayPal Gateway checkbox to display PayPal smart buttons in your shop.
- Title – The title for the PayPal gateway the user sees during the checkout process.
- Description – The description the user sees during the checkout process.
- Intent – The intent is to either capture a payment immediately after an order is created or authorize a payment for later capture. When configuring Authorize intent, automatic payment captures can be configured for virtual products or when changing the order status. SET Intent to CAPTURE
- Instant Payments – If you enable this setting, PayPal will be instructed not to allow the buyer to use funding sources that take additional time to complete (e.g., eChecks). Instead, the buyer will be required to use an instant funding source, such as instant transfer, credit/debit card, or Pay Later.
- Brand Name – Control the name of your shop that customers will see during the payment process.
- Landing Page – Type of PayPal page to display in the popup after clicking the button.
- Disable Alternative Payment Methods – All possible funding sources such as Credit Cards, Venmo, or other Alternative Payment Methods will be shown by default for eligible buyers. Disable funding sources with this setting.
- Send checkout billing data to card fields – Using the WooCommerce form data increases convenience for the customers as they don’t have to enter their details twice, but it can cause issues if card details do not match the billing data in the checkout form.
- Create gateway for Standard Card Button – By default, the Debit or Credit Card button is displayed in the PayPal Checkout payment gateway. This setting creates a separate gateway only for the Card button.
Advanced Card Processing & Fastlane
Permission required
Get PayPal account permission to use Advanced Card Processing payment functionality by following the guide here.
After completing the onboarding process for Advanced Card Payments, follow these steps to navigate to the Advanced Card Processing settings:
- Go to WooCommerce > Settings > Payments > PayPal.
- Click the Advanced Card Processing tab.
- Check Enable/Disable to activate advanced card features and a separate checkout gateway exclusively for card payments.
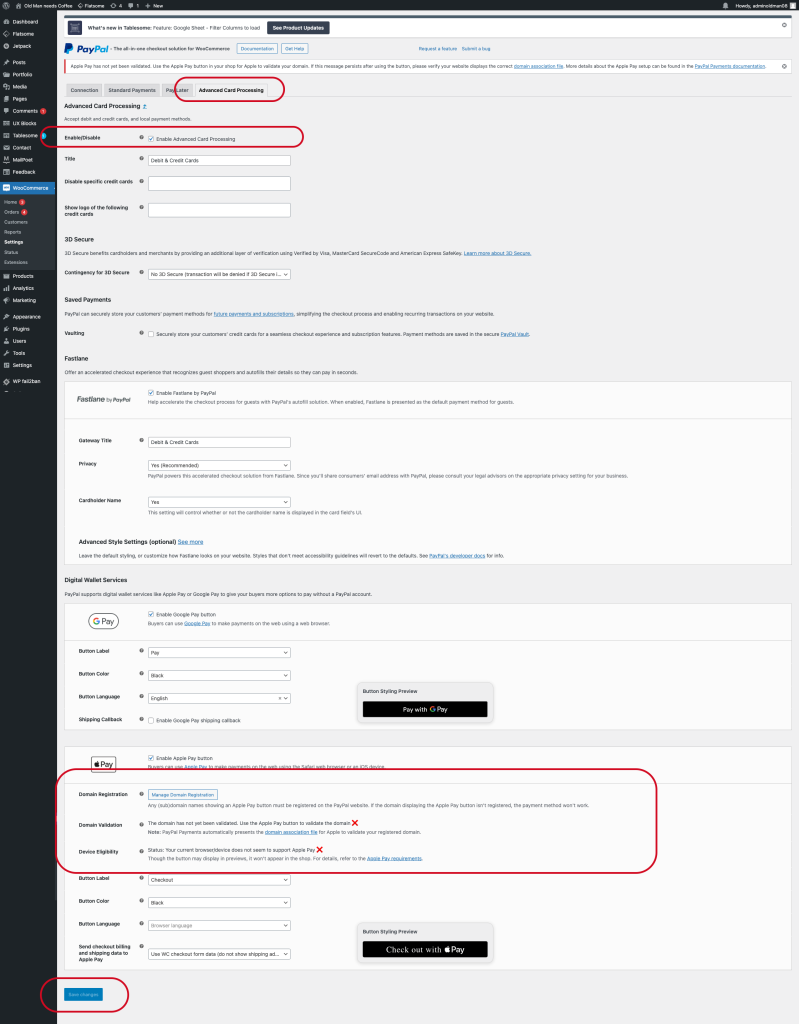
The following settings can be configured for Advanced Card Processing:
- Enable/Disable – Once enabled, the Credit Card option will show up in Checkout.
- Title – This controls the title that the user sees during Checkout.
- Vaulting – Enable Vaulting to save credit and debit cards for future payments and subscription functionality.
- Disable specific credit cards – All possible credit cards will be accepted by default. You have the option to disable certain credit cards.
- Show logo of the following credit cards – Define which credit card logos you want to display for the gateway.
- Contingency for 3D Secure – Select a preferred 3D Secure behavior:
- No 3D Secure – causes transactions to be denied if 3D Secure is required by the bank of the cardholder.
- 3D Secure when required – returns a 3D Secure contingency when it is a mandate in the region where you operate.
- Always trigger 3D Secure – triggers 3D Secure for every transaction, regardless of SCA requirements. Learn more about 3D Secure.
Read Advanced Card Processing – Advanced Credit and Debit Card payments for more information about advanced card payments.
Apple Pay
Setup instructions
Follow these steps to sign up for Apple Pay and enable it in the PayPal Payments extension:
- Sign up for Apple Pay
- Navigate to the Connection tab and click
Check available featuresto refresh your feature eligibility - In the Advanced Card Processing tab under
Digital Wallet Services, checkEnable Apple Pay buttonand clickSave changes - Click the
Manage Domain Registrationbutton - Register the shop domain on the PayPal website;
- If your website is available at
https://example.com/, then you would need to registerexample.comon the PayPal website - If your website includes e.g. a
www.subdomain, it must be included in the registration, likewww.example.com.
- If your website is available at
- The Apple Pay button should now be functional and appear wherever the PayPal smart buttons are enabled
- To update the validation status notice in the plugin, click the Apple Pay button in the shop from a supported device
More details about the setup
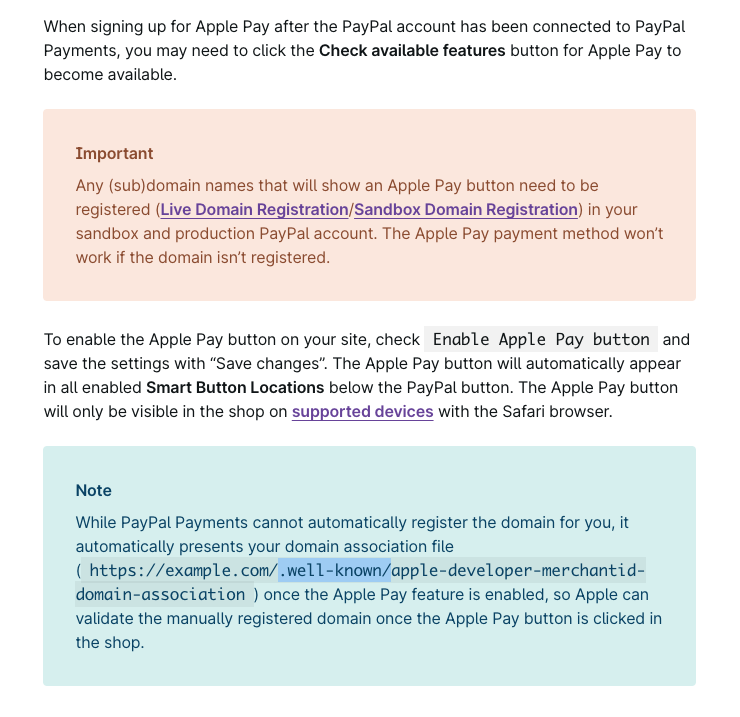
Your domain must be registered on the PayPal website by clicking the “Manage Domain Registration” button.
The PayPal website may instruct you to download the apple-developer-merchantid-domain-association file and place it in the .well-known folder on your web server. This step can be skipped as PayPal Payments automatically presents the file in the right location to simplify the setup for you.
The Domain Validation status will update after the Apple Pay button has been used on the website. You can view the file by clicking the link on “domain association file”. If the Validation displays a failed status despite the domain being registered and the domain association file being presented, you may only need to click the Apple Pay button on your website once to update the status. As soon as the payment sheet from Apple is loaded and awaiting confirmation, the validation is successful.
Apple presents the Apple Pay button only on eligible devices. The Device Eligibility helps you understand if you can expect to see the button on your website with your current device. The button may appear in the Button Styling Previews regardless of your device eligibility so you can style it to your liking.
Pay Later & Pay Later Messaging
Pay Later
Pay Later is a feature that enables customers to pay over time while you receive payment upfront, without any additional cost. This feature is available in select locations and consists of the Pay Later button and the Pay Later messaging to promote the Pay Later option to eligible buyers.
The Pay Later tab provides a configuration interface for the Pay Later option, which is only available to customers in eligible countries. In this section, you can enable or disable the Pay Later button and Pay Later messaging and customize their appearance for individual locations.
Pay Later Messaging
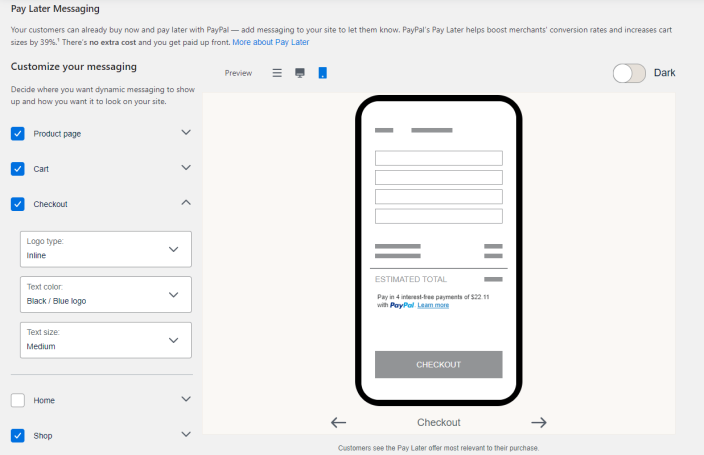
Pay Later messaging lets your buyers know they can buy now and pay later, if they check out with PayPal. Adding messaging to your website can help improve conversion, attract new customers, and increase order values. Pay Later messages are dynamic, enabling you to show your customers their specific Pay Later offer, based on the contents of their shopping cart.
By default, the following Pay Later Messaging Locations are available:
- Single Product page
- Cart
- Checkout
- Home
- Shop (includes Search & Product Categories pages)
The messaging can be configured to match your website style with the settings available in the new Pay Later messaging configurator:
The Pay Later messaging & configurator languages depend on the primary country of the PayPal merchant account.
More details about the requirements & benefits of adding Pay Later messaging to your site can be found in the Pay Later section.
woo resources